

Cold air bites harder when night falls in the wild, and the difference between comfort and danger often comes down to the shelter I build before darkness sets in. Shelter is not just about staying dry or blocking the wind, it is about preserving energy, maintaining morale, and creating a space where I can think clearly about my next move. Over time, I have come to rely on techniques that prioritize efficiency, adaptability, and smart use of the environment rather than brute effort.
Reading The Environment Before Building
The first step I take is scanning the environment with intent rather than rushing into construction. I look for natural windbreaks like rock formations, dense bushes, or fallen trees that can do half the work for me. These features reduce exposure and save valuable energy that would otherwise be spent reinforcing a weak structure.
Ground conditions also play a major role in where I settle. Low areas might seem sheltered, but they often collect cold air and moisture overnight. I prefer slightly elevated ground that drains well, even if it means adjusting my initial plan. A dry base can make the difference between restful sleep and a miserable, shivering night.
Sun exposure matters more than most people expect. I position my shelter to catch early morning sunlight whenever possible because it helps warm the space quickly. That small advantage boosts both physical comfort and mental resilience after a long night outdoors.
The Lean-To Shelter Method
The lean-to is one of the first techniques I mastered because of its simplicity and effectiveness. I start by selecting a sturdy horizontal support, usually a fallen log or a branch secured between two trees. This becomes the backbone of the shelter, and everything else builds off of it.
Once the frame is set, I lean smaller branches against the support at an angle, creating a slanted wall. I make sure the angle faces away from the wind to maximize protection. The tighter I place the branches, the better the structure retains heat and blocks out the elements.
Insulation transforms the lean-to from basic cover into a reliable refuge. I layer leaves, grass, or pine needles over the frame to trap warmth and repel water. A thick bed of the same materials on the ground prevents heat loss and keeps me from feeling every uneven rock beneath me.
Debris Hut For Cold Conditions
Cold environments demand a shelter that prioritizes heat retention above all else, and the debris hut excels in this role. I begin by creating a ridgepole using a long branch, propped up at one end and resting on the ground at the other. This forms a triangular shape that becomes the skeleton of the structure.
Next, I add ribs along both sides of the ridgepole using smaller sticks. These ribs should be close enough together to support heavy layers of debris without collapsing. The goal is to create a framework that can hold as much insulating material as possible.
I then pile on leaves, moss, and any soft organic material I can gather. The thicker the layer, the better the insulation, often reaching several feet in depth. Crawling inside feels like entering a cocoon, where body heat gets trapped and maintained throughout the night.
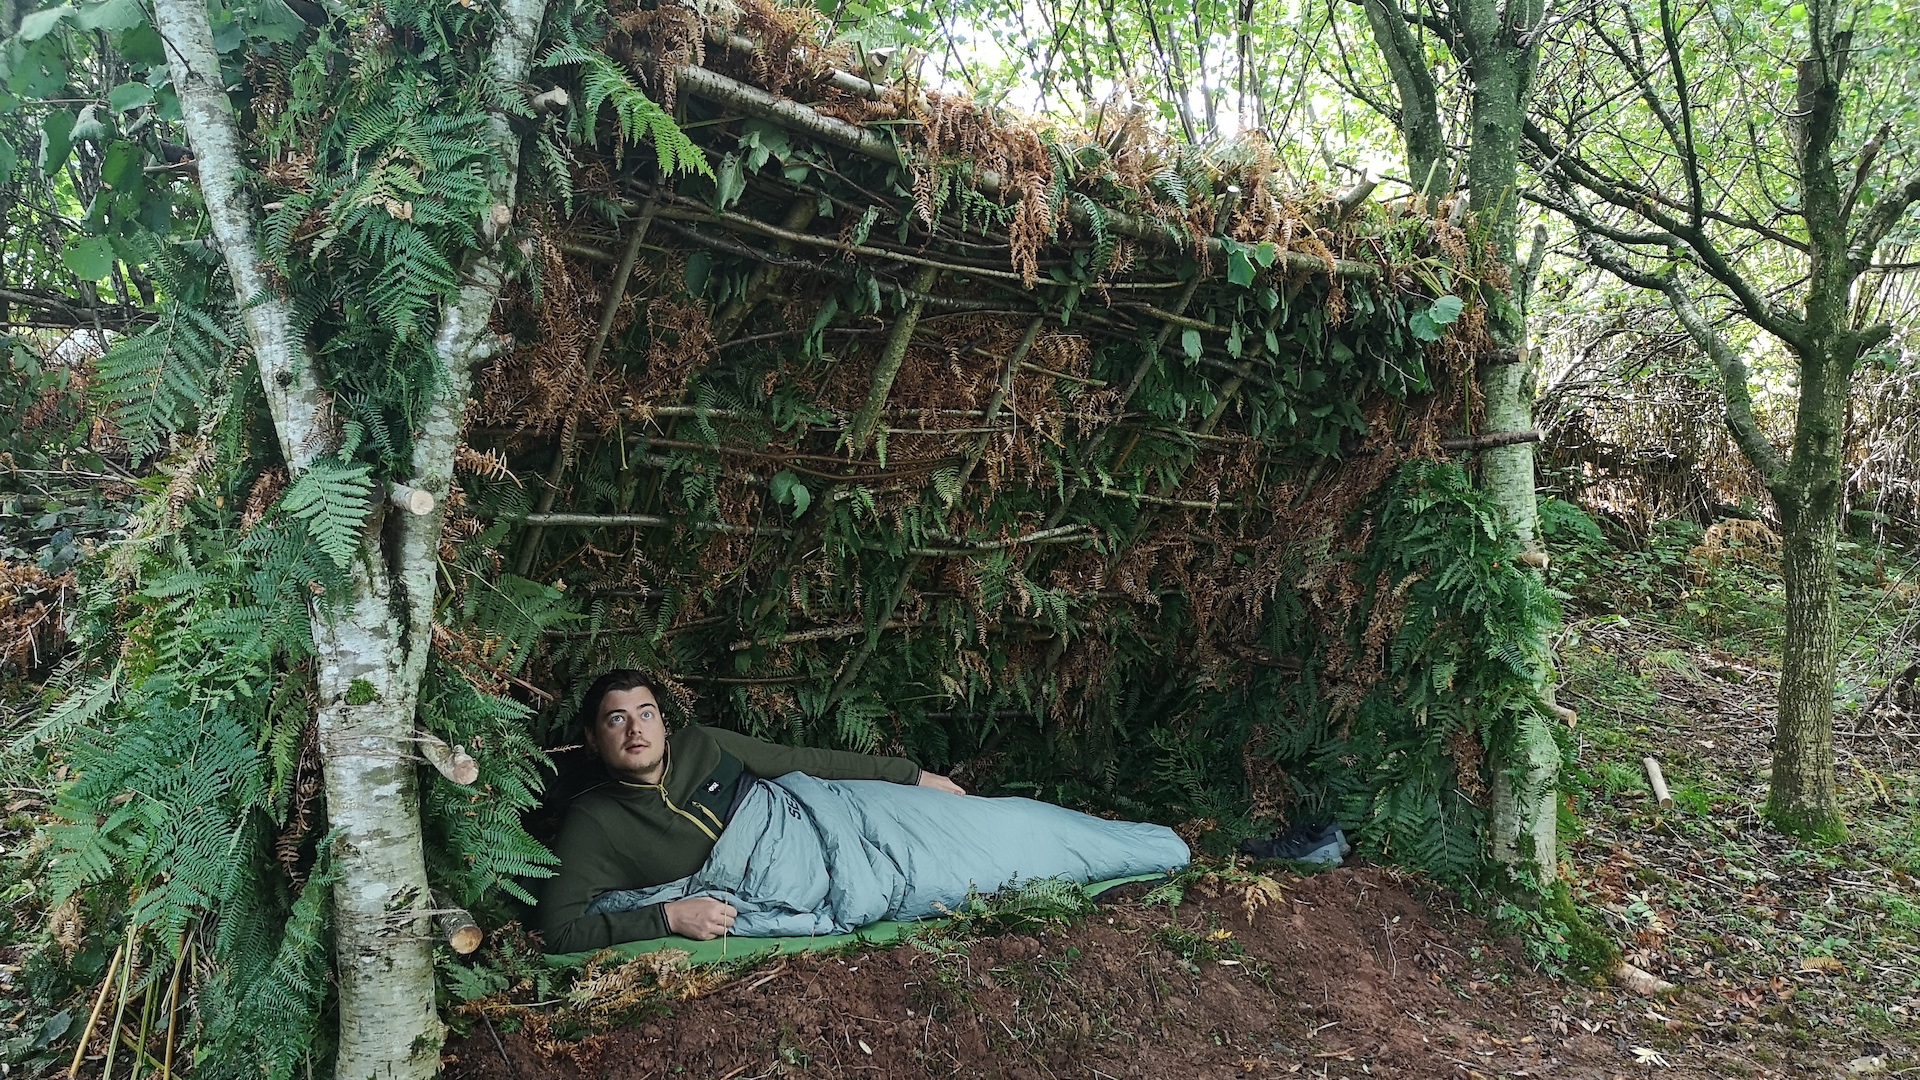
A-Frame Shelter For Balanced Protection
The A-frame shelter offers a balance between coverage and ventilation, making it versatile across different climates. I construct it by placing a ridgepole between two supports, then leaning branches on both sides to form a triangular shape. This design provides protection from wind coming from multiple directions.
One advantage of the A-frame is its symmetry, which allows me to adjust entrances based on shifting weather conditions. If the wind changes direction, I can block one side and use the other as access. This flexibility is especially useful in unpredictable environments.
I reinforce the structure with layers of foliage, bark, or even pieces of fabric if available. The goal is to create a barrier that blocks wind while still allowing minimal airflow to prevent condensation buildup. A well-built A-frame feels stable and dependable even during rough weather.
Using Natural Shelters To Save Energy
Sometimes the best shelter is already waiting in the environment, and recognizing it can save significant effort. Caves, rock overhangs, and hollow logs provide immediate protection without the need for extensive construction. I always inspect these spaces carefully before settling in.
Safety checks are essential when using natural shelters. I look for signs of animal activity, unstable rock formations, or potential flooding risks. A shelter that seems convenient at first glance can quickly become dangerous if these factors are ignored.
Enhancing a natural shelter with small modifications makes it more effective. I might add a wind barrier at the entrance or lay down insulation on the ground. These simple adjustments turn a basic refuge into a comfortable and secure place to rest.
Tarp Shelters For Quick Setup
When I have access to a tarp, shelter building becomes faster and more efficient. A tarp can be configured in multiple ways depending on the terrain and weather conditions. This flexibility makes it one of the most valuable tools in my kit.
I often use a simple lean-to configuration with a tarp, securing one edge to a support and anchoring the other side to the ground. This creates a quick barrier against wind and rain without requiring extensive materials. The setup takes minutes, leaving more time for other survival tasks.
In harsher weather, I adjust the tarp into a more enclosed shape, such as an A-frame or a low-profile wedge. These configurations provide better protection but require careful tensioning to prevent sagging. A well-pitched tarp can handle strong winds and heavy rain surprisingly well.
Insulation Techniques That Make A Difference
Shelter walls alone are not enough to maintain warmth, and insulation plays a critical role in survival. I focus heavily on ground insulation because heat loss through the ground can be severe. A thick layer of leaves or grass creates a barrier that preserves body heat.
Layering is the key principle I follow for insulation. Multiple layers of natural materials trap air, which acts as an effective insulator. Even in wet conditions, having several layers helps retain some warmth.
I also pay attention to sealing gaps in the shelter. Small openings can allow cold air to enter and disrupt the internal temperature. Filling these gaps with debris or additional materials improves overall comfort and efficiency.
Fire Integration With Shelter Design
Positioning a fire near the shelter can significantly improve warmth, but it requires careful planning. I place the fire at a safe distance to avoid accidental ignition while still benefiting from its heat. The angle of the shelter matters, as it should reflect heat inward rather than letting it escape.
A reflective wall behind the fire enhances its effectiveness. I build this using logs, rocks, or even stacked branches to direct heat toward the shelter. This simple addition can double the warmth reaching the interior space.
Managing smoke is equally important. I ensure there is enough ventilation to prevent smoke buildup while still maintaining heat. Striking this balance takes practice but makes a noticeable difference in comfort during cold nights.
Adapting To Weather Conditions
Weather conditions dictate how I modify my shelter, and flexibility is essential. In rainy environments, I prioritize waterproofing and drainage. I angle the roof steeply and create channels to direct water away from the shelter.
Windy conditions require a lower profile and stronger anchoring. I build closer to the ground to reduce exposure and use heavier materials to secure the structure. This approach minimizes the risk of collapse during strong gusts.
Hot climates shift the focus toward ventilation and shade. I create shelters that allow airflow while blocking direct sunlight. Staying cool becomes just as important as staying dry or warm in these conditions.
Common Mistakes And How I Avoid Them
Rushing the process often leads to weak shelters that fail under pressure. I take the time to plan and gather enough materials before starting construction. A well-prepared approach saves effort in the long run.
Another common mistake is underestimating the importance of insulation. A sturdy structure without proper insulation can still leave me cold and uncomfortable. I always prioritize materials that enhance warmth and protection.
Ignoring the environment is a mistake that can have serious consequences. Building in the wrong location exposes me to unnecessary risks like flooding or falling debris. Careful observation helps me avoid these hazards and build smarter shelters.
Building With Limited Resources
Limited resources force creativity, and I adapt by using whatever materials are available. Branches, leaves, and even clothing can become part of the shelter. The goal is to maximize what I have rather than focusing on what I lack.
I also simplify designs when resources are scarce. A basic lean-to with proper insulation can be more effective than a complex structure built poorly. Efficiency becomes more important than complexity in these situations.
Reusing materials from previous shelters or natural debris saves time and effort. I often find that the environment provides enough if I pay attention and think creatively. This mindset turns limitations into manageable challenges.
Final Thoughts On Shelter Mastery
Mastering shelter building is less about memorizing designs and more about developing instincts. Each environment presents unique challenges, and adapting to those challenges is what makes the difference. I rely on proven techniques, but I also stay open to adjusting them based on the situation.
Experience has taught me that comfort and safety are closely linked in survival scenarios. A well-built shelter not only protects me physically but also gives me the confidence to face whatever comes next. That sense of security is just as valuable as the shelter itself.
Every time I build a shelter, I refine my approach and learn something new. The process becomes more intuitive with practice, turning what once felt like a challenge into a reliable skill. In the wild, that skill can mean the difference between enduring the night and truly resting through it.