
Cold air settles in quickly once the sun dips below the horizon, and that is when the importance of shelter becomes real. Out in the wild, a well-built shelter is more than a place to rest; it becomes protection, warmth, and peace of mind. I have learned that with the right approach and a bit of patience, natural materials can provide everything needed to create a safe and reliable refuge. The forest, the field, or even a coastal area all offer resources that can be shaped into something sturdy enough to withstand wind, rain, and cold nights.
Start With Location Selection
The ground I choose determines whether my shelter will work with me or against me. I always look for slightly elevated terrain to avoid flooding if it rains, and I stay away from valleys where cold air tends to settle overnight. Flat ground makes construction easier, but I also make sure the area is not exposed to strong winds or falling branches.
Nearby resources matter just as much as the ground itself. I prefer a location where wood, leaves, and other materials are within easy reach so I do not waste energy carrying them long distances. Access to water is important, but I avoid building too close to rivers or streams because rising water levels can become dangerous.
I also pay attention to natural windbreaks like large rocks, dense bushes, or tree lines. These features help reduce heat loss and make the shelter more comfortable without requiring extra effort. A good location saves time, energy, and prevents problems later on.
Gather The Right Natural Materials
Once the spot is set, I focus on collecting materials that are both strong and flexible. Sturdy branches form the frame, and I look for ones that are about as thick as my wrist for the main structure. Smaller sticks and twigs help fill in gaps and reinforce the overall build.
Leaves, grass, and moss play a big role in insulation. Dry materials work best because they trap air and keep warmth inside. I gather more than I think I need, since a thick layer is always better than a thin one when it comes to staying warm.
Vines, roots, or even strips of bark can act as natural cordage. These are useful for tying parts of the structure together when needed. If none are available, I rely on careful placement and interlocking branches to keep everything stable.
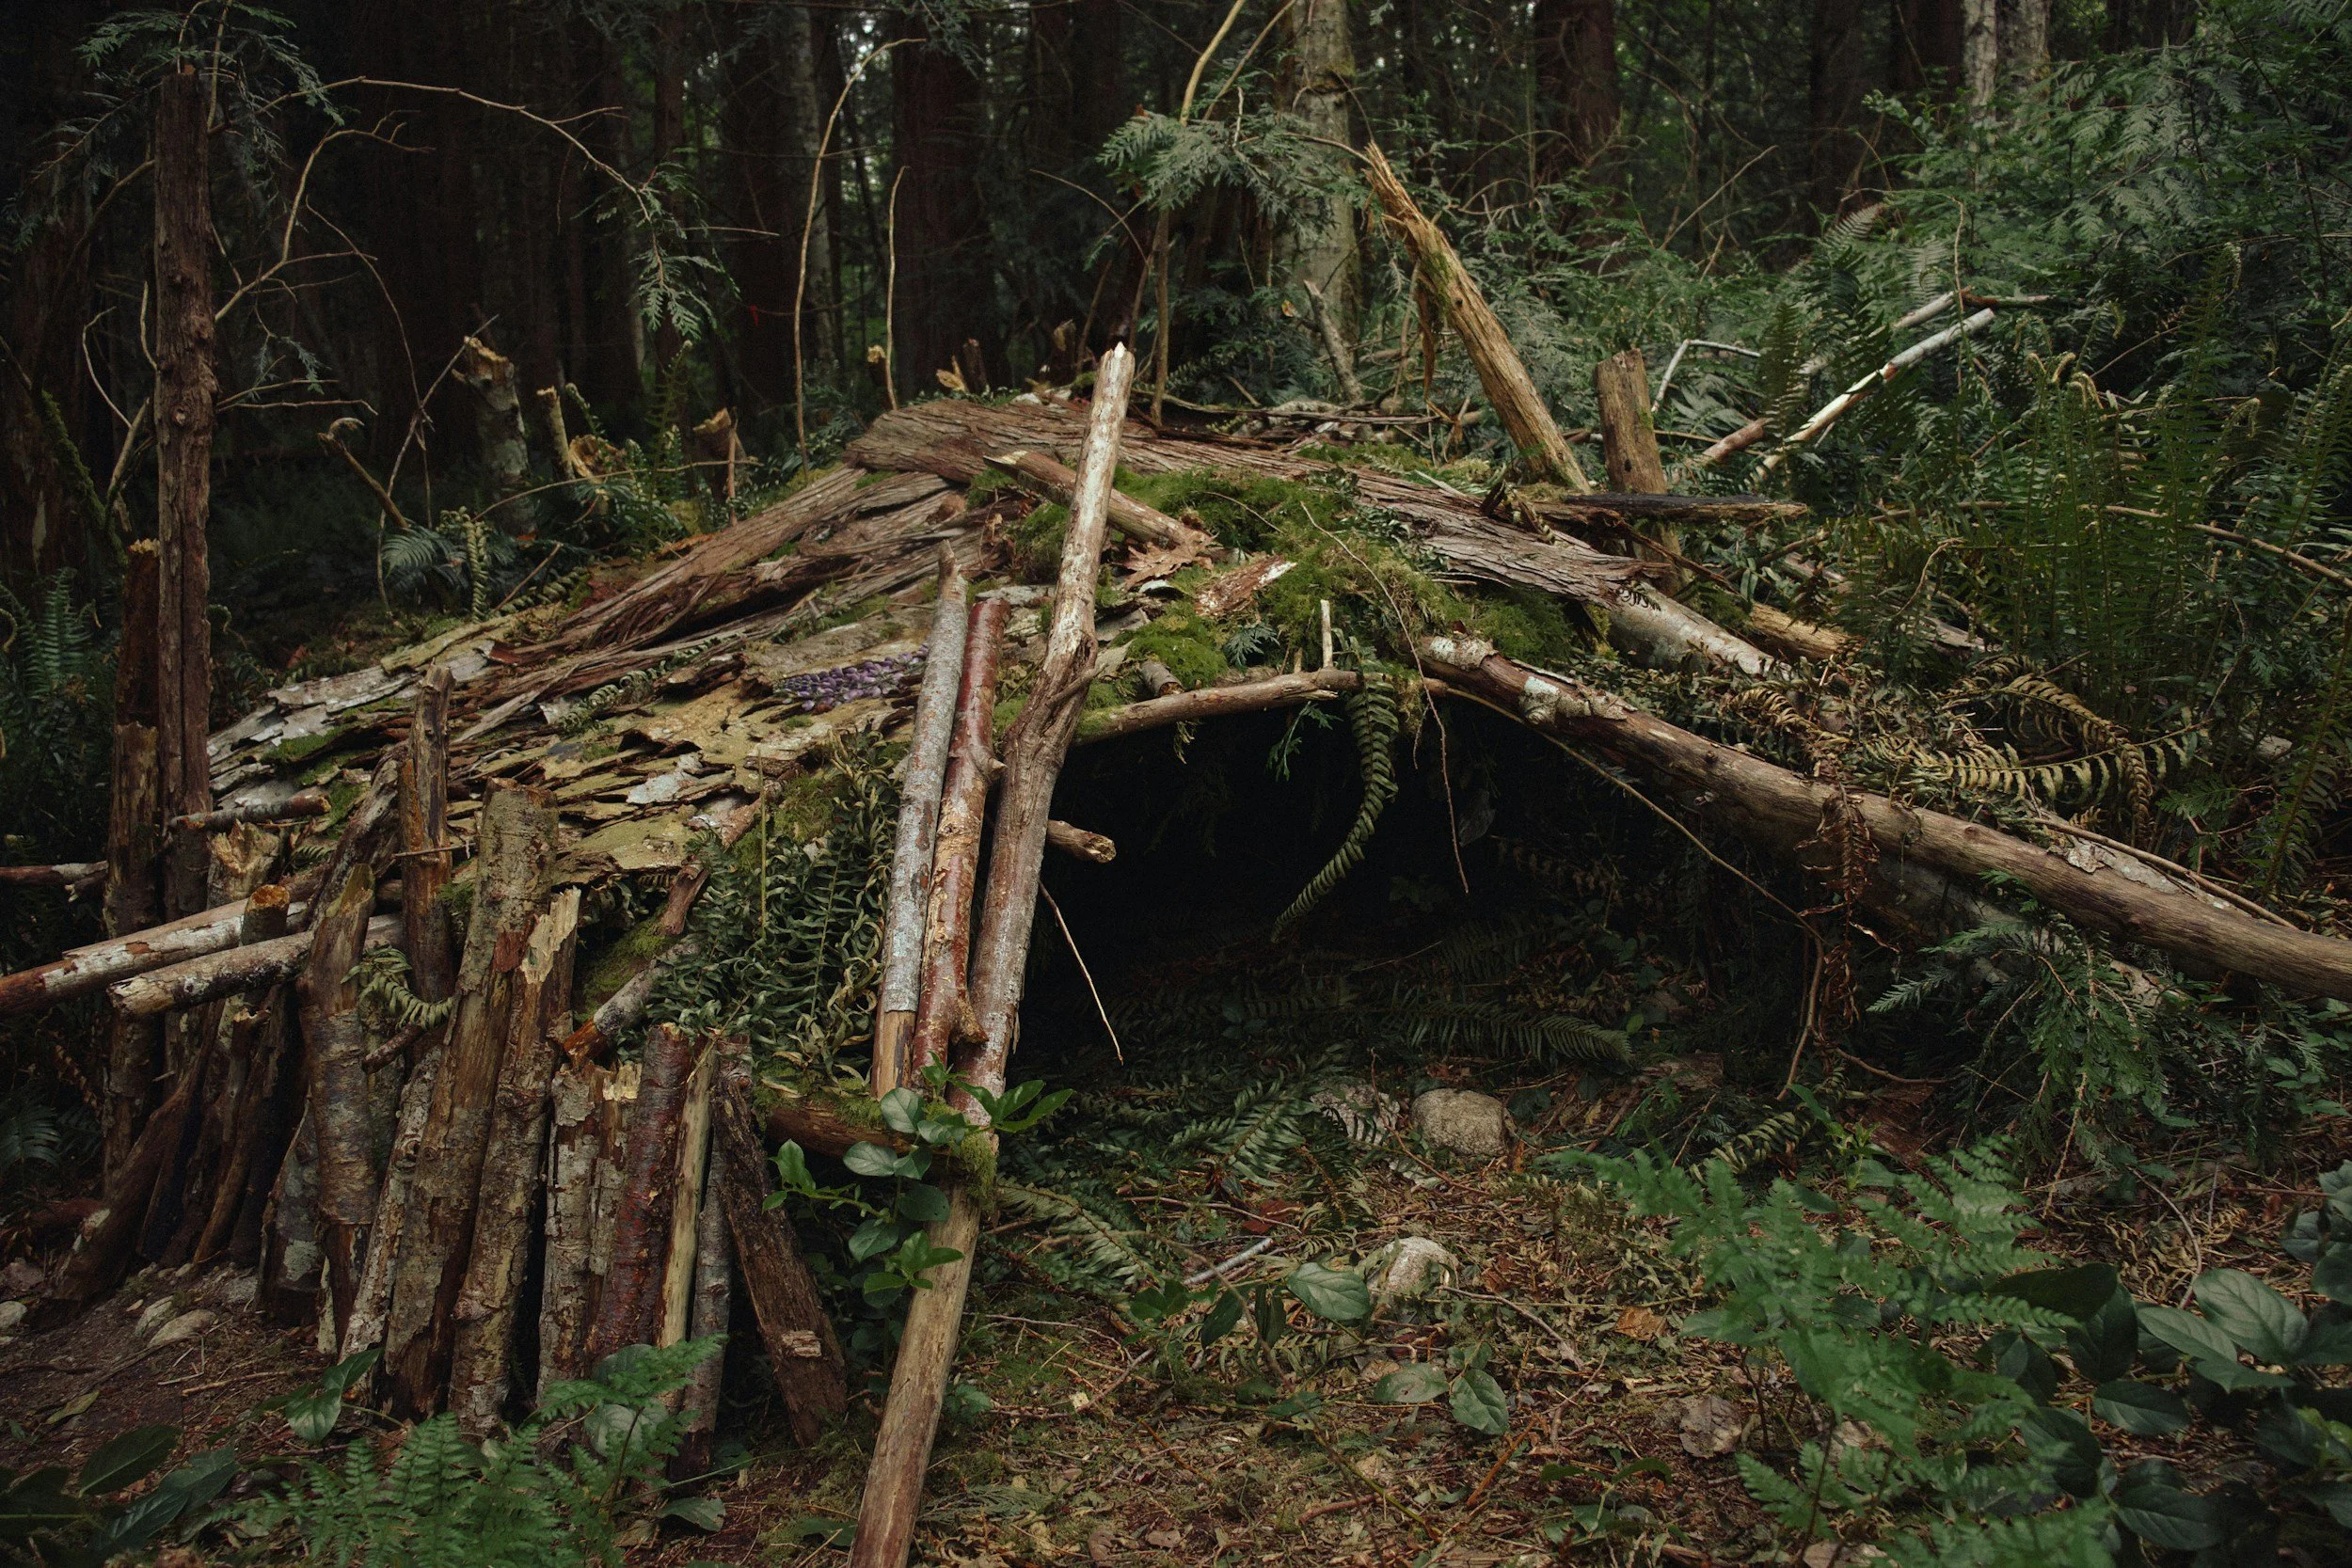
Build A Strong Foundation
The frame is what holds everything together, so I take my time getting it right. I usually start with a ridge pole, which is a long, sturdy branch placed between two supports. This becomes the backbone of the shelter and determines its overall shape.
Leaning branches against the ridge pole creates a triangular structure that is both simple and strong. I space them close enough to support the covering materials but not so tight that it becomes difficult to work. The angle matters because it helps rain run off instead of pooling on top.
I make sure the structure feels solid before moving on. If it shifts too easily or creaks under pressure, I reinforce it with additional branches. A stable frame makes everything else easier and prevents collapse during bad weather.
Use Layering For Insulation
Insulation is what turns a basic structure into a livable shelter. I start by placing smaller sticks across the frame to create a surface for holding leaves and other materials. This layer acts like a net, preventing insulation from falling through.
On top of that, I pile leaves, grass, and moss as thickly as possible. I aim for at least several inches of coverage, but more is always better. The goal is to trap air within the layers, which helps retain body heat inside the shelter.
I also cover the shelter from the bottom up, like shingles on a roof. This method allows rain to flow downward without seeping inside. Proper layering keeps both water and wind from entering, making a huge difference in comfort.
Block Wind And Rain Effectively
Open gaps can ruin even the best-built shelter, so I carefully inspect the structure for weak points. Any holes between branches get filled with smaller sticks, leaves, or mud if available. This helps seal the shelter and prevents cold air from sneaking in.
I pay special attention to the direction of the wind. The back of the shelter faces into the wind, while the entrance is positioned away from it. This simple adjustment reduces heat loss and makes the interior much more comfortable.
If rain is expected, I add an extra outer layer of large leaves or bark. These materials act like natural shingles and provide additional protection. A well-sealed shelter can handle surprising amounts of bad weather without leaking.
Create A Comfortable Sleeping Area
Sleeping directly on the ground pulls heat away from the body, so I always build a raised or insulated bed. I start by laying down a thick layer of dry leaves or grass inside the shelter. This creates a barrier between me and the cold ground.
If materials allow, I build a simple platform using small logs or branches. This lifts me slightly off the ground and improves insulation even more. Comfort may seem secondary, but rest is essential for maintaining energy and focus.
I also make sure there is enough space to lie down without touching the walls. Contact with the shelter walls can transfer moisture and cold, which defeats the purpose of insulation. A proper sleeping area makes a big difference in how well I recover overnight.
Use Fire Strategically Near The Shelter
A fire can transform a shelter into a warm refuge, but placement is critical. I build the fire a short distance from the entrance, not too close to risk sparks catching the structure. The heat radiates inward, especially if the shelter opening faces the fire.
To improve heat reflection, I sometimes build a simple wall behind the fire using logs or stones. This reflects warmth back toward the shelter instead of letting it dissipate into the open air. It is a small addition that significantly boosts efficiency.
Safety remains a priority at all times. I clear the ground around the fire to prevent it from spreading and keep water or dirt nearby to extinguish it if needed. A controlled fire adds comfort without introducing unnecessary risk.
Adapt Shelter Types To Different Environments
Different environments require different approaches, and flexibility makes all the difference. In a forest, a lean-to shelter works well because materials are abundant and easy to shape. In open areas, I might build a debris hut that uses thick insulation to retain heat.
Near coastal areas, driftwood and seaweed become valuable resources. I use driftwood for structure and seaweed for insulation, though I let it dry first to avoid moisture issues. Each environment offers unique materials that can be used effectively with the right mindset.
Snowy conditions call for entirely different methods, such as building snow shelters or using packed snow for insulation. While the principles remain the same, the materials change based on what is available. Adapting quickly ensures survival in any setting.
Maintain And Improve The Shelter Over Time
A shelter is not something I build once and forget. Weather, wind, and use can weaken parts of the structure, so I check it regularly for damage. Reinforcing weak spots early prevents bigger problems later on.
I also look for ways to improve comfort as time goes on. Adding more insulation, adjusting the entrance, or improving the sleeping area can make the shelter feel more secure and livable. Small changes can have a big impact over multiple nights.
Maintenance becomes part of the routine, especially in longer stays. A well-maintained shelter continues to protect and support me without requiring a complete rebuild.
Final Thoughts On Building With Nature
Building a shelter using only natural materials is a skill that blends awareness, patience, and creativity. Each step, from selecting the location to layering insulation, plays a role in creating a safe and reliable space. The process becomes easier with experience, and every shelter teaches something new.
The natural world provides everything needed to survive if I pay attention and use resources wisely. With practice, I have found that even simple materials can be transformed into something strong and dependable. A good shelter does more than protect from the elements; it creates a sense of security that allows me to rest, recover, and move forward with confidence.